CSS: Box Model
When using some properties, such as border and padding, you may notice that it affects the final block size. And indeed it does. This is how browsers calculate the final block size on the page:
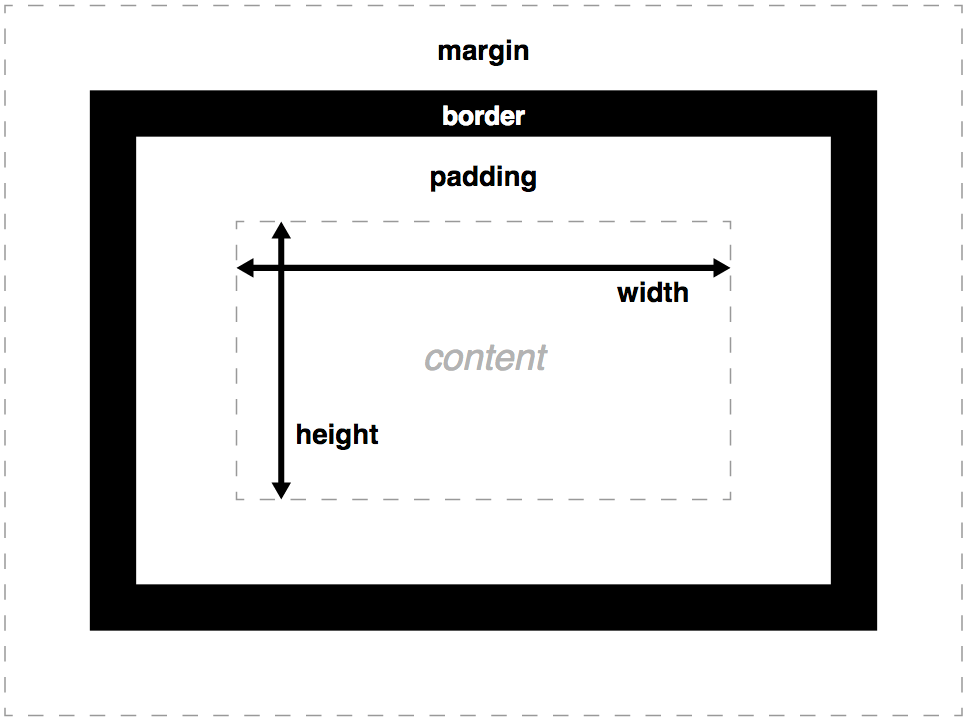
I.e., the final size is set not only by the properties height and width but by many other ones:
padding- internal marginsborder- bordersmargin- outer indents
Essentially, to determine the final size of the element, you must add up the values of all these properties. For example, what will be the width of this block?
.box {
  width: 100px;
  height: 100px;

  padding: 20px;
  margin: 10px;

  border: 1px solid #fff;
}100px? 120px? 121px? How do I find out this value? You have to add up all the values that form the block horizontally:
widthpadding-left/padding-rightborder-left/border-rightmargin-left/margin-right
So, the final width of the element on the page 100px + 20px + 20px + 1px + 1px + 10px + 10px is 162px.
This behavior is called the box model. It describes the relationship between properties and the final size of an element. According to this model, browsers "draw" a block, layering rules on top of each other before displaying the element on the page.
This model is worth remembering because when working with CSS, it's important to understand how and where the browser "draws" the block, and how it will affect its height and width.
But you can agree that when you set the width and height properties, you expect those exact values. Is it possible to change the behavior of the box model? Yes! To do this, use the property box-sizing, which takes the following values:
content-box- default value. It works as described aboveborder-box- the values of the border and margins do not make the element bigger, but rather "eat up" the space in the content, i.e., the properties will not affect the height and width. If a fixed value is set, it will remain so, but there will be less space for the content inside
Instructions
Add div to the editor with the card-hello class and set the following rules:
- background color:
#fa7268 - text color:
#ffffffff - block width: 230 pixels
- block height: 25 pixels
- padding: 20 pixels
- margins: 10 pixels
- border: 2 pixels wide, solid. Color
#9c27b0 - font size: 20 pixels
Write the styles in the <style> tag
If you've reached a deadlock it's time to ask your question in the «Discussions». How ask a question correctly:
- Be sure to attach the test output, without it it's almost impossible to figure out what went wrong, even if you show your code. It's complicated for developers to execute code in their heads, but having a mistake before their eyes most probably will be helpful.
CSS: Box Model
When using some properties, such as border and padding, you may notice that it affects the final block size. And indeed it does. This is how browsers calculate the final block size on the page:
I.e., the final size is set not only by the properties height and width but by many other ones:
padding- internal marginsborder- bordersmargin- outer indents
Essentially, to determine the final size of the element, you must add up the values of all these properties. For example, what will be the width of this block?
.box {
  width: 100px;
  height: 100px;

  padding: 20px;
  margin: 10px;

  border: 1px solid #fff;
}100px? 120px? 121px? How do I find out this value? You have to add up all the values that form the block horizontally:
widthpadding-left/padding-rightborder-left/border-rightmargin-left/margin-right
So, the final width of the element on the page 100px + 20px + 20px + 1px + 1px + 10px + 10px is 162px.
This behavior is called the box model. It describes the relationship between properties and the final size of an element. According to this model, browsers "draw" a block, layering rules on top of each other before displaying the element on the page.
This model is worth remembering because when working with CSS, it's important to understand how and where the browser "draws" the block, and how it will affect its height and width.
But you can agree that when you set the width and height properties, you expect those exact values. Is it possible to change the behavior of the box model? Yes! To do this, use the property box-sizing, which takes the following values:
content-box- default value. It works as described aboveborder-box- the values of the border and margins do not make the element bigger, but rather "eat up" the space in the content, i.e., the properties will not affect the height and width. If a fixed value is set, it will remain so, but there will be less space for the content inside
Instructions
Add div to the editor with the card-hello class and set the following rules:
- background color:
#fa7268 - text color:
#ffffffff - block width: 230 pixels
- block height: 25 pixels
- padding: 20 pixels
- margins: 10 pixels
- border: 2 pixels wide, solid. Color
#9c27b0 - font size: 20 pixels
Write the styles in the <style> tag
If you've reached a deadlock it's time to ask your question in the «Discussions». How ask a question correctly:
- Be sure to attach the test output, without it it's almost impossible to figure out what went wrong, even if you show your code. It's complicated for developers to execute code in their heads, but having a mistake before their eyes most probably will be helpful.
Your exercise will be checked with these tests:
const { test } = require('tests');

test(({ query, expect }) => {
  const element = query(document, '.card-hello');
  const style = getComputedStyle(element);

  expect(style).to.have.property('width', '230px');
  expect(style).to.have.property('height', '25px');

  expect(style).to.have.property('padding', '20px');
  expect(style).to.have.property('margin', '10px');

  expect(style).to.have.property('color', 'rgb(255, 255, 255)');
  expect(style).to.have.property('font-size', '20px');

  expect(style).to.have.property('border-width', '2px');
  expect(style).to.have.property('border-color', 'rgb(156, 39, 176)');
  expect(style).to.have.property('border-style', 'solid');

  expect(style).to.have.property('background-color', 'rgb(250, 114, 104)');
});Teacher's solution will be available in:
20:00
